

Article prepared by Mobline
Last spring, I helped my cousin set up internet at his new farm. He’d been waiting six months for the local ISP to run cable — they kept saying “next month” but nothing ever happened. Finally got tired of waiting and ordered Starlink. When the box arrived, he asked me: “Is this the latest one? I heard something about different generations.”
Turned out he got Gen 3, which is exactly what you want right now. The previous generations are discontinued, and honestly, after seeing how Gen 3 performs compared to the older Gen 2 I’d installed at a friend’s cabin, the difference is real. Not just marketing speak — actual improvements you notice within the first week of use.
Let me walk you through what makes Starlink 3 generation worth getting, what actually changed from previous versions, and what to watch out for when buying one.
What Actually Changed in Starlink 3 Generation
SpaceX doesn’t just slap a new number on things for marketing. Gen 3 brought real hardware improvements that matter in daily use:
The dish got significantly smaller
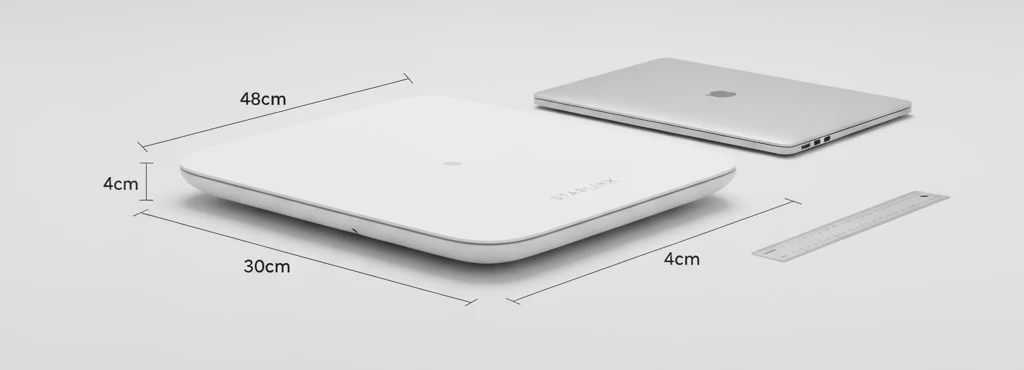
Gen 2 was 60×50 cm and weighed 4.2 kg. Gen 3 is 48×30 cm and weighs 2.9 kg. That’s 30% smaller and lighter. Sounds minor until you’re the one carrying it up a ladder or trying to mount it on an RV roof. Plus it’s easier to find mounting spots.
My cousin’s wife was worried about how the dish would look on their farmhouse roof — didn’t want some massive thing ruining the view. When she saw how compact Gen 3 actually is, she was fine with it. Blends in way better than the older versions.
Power consumption dropped considerably
Gen 2 pulled 60-70 watts during operation. Gen 3 pulls 40-50 watts. For most people that’s just slightly lower electric bills. But if you’re running off solar panels or a generator, that 20-watt difference adds up fast. Over 24 hours, that’s nearly 500 watt-hours saved.
Know a guy who runs Starlink on his sailboat. With Gen 2, he had to run his generator constantly or have a huge battery bank. Switched to Gen 3 and now his solar panels can actually keep up with the dish plus his regular boat power needs.
Speed and latency improvements are noticeable
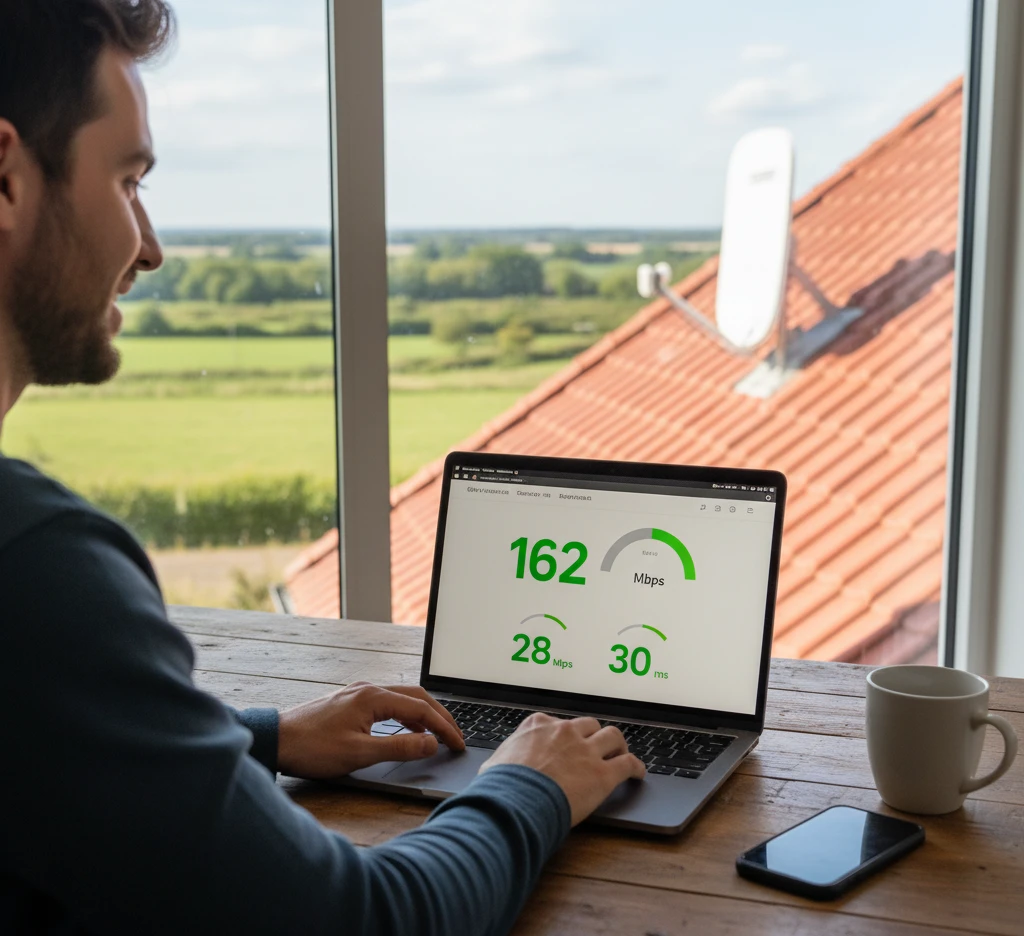
Official specs say 100-200 Mbps download vs 50-150 Mbps for Gen 2. In real-world use, I’m consistently seeing 140-160 Mbps with Gen 3, while Gen 2 typically gave 80-100 Mbps. For video calls, cloud work, streaming — the difference shows.
Latency also improved. Gen 2 hovered around 40-60ms. Gen 3 typically runs 25-35ms. For gaming and real-time video conferencing, that reduction matters more than you’d think. Video calls feel more natural, less like talking through a delay.
Weather performance got better
Gen 2 sometimes struggled with wet snow — the heating couldn’t keep up fast enough. Gen 3 melts snow faster and the connection algorithms improved. Even during heavy snowfall, it maintains connection better.
Cousin’s farm is in upstate New York. First winter with his Gen 3, we got slammed with a massive snowstorm — 18 inches overnight. His internet never dropped. Just kept working. With old satellite internet, he’d be offline for days after storms like that.
Wi-Fi 6 router instead of Wi-Fi 5
The included router upgraded from Wi-Fi 5 to Wi-Fi 6. For large homes with lots of devices, this makes a real difference. Better coverage, less congestion when everyone’s online at once.
Longer warranty period
SpaceX gives Gen 3 a 5-year warranty vs 3 years for Gen 2. That tells you something about their confidence in the hardware reliability.
Why You Shouldn’t Buy Older Generations
Still see Gen 1 and Gen 2 units for sale, usually a few hundred bucks cheaper. Seems tempting. Don’t do it. Here’s why:
They’re discontinued — no more manufacturing
SpaceX stopped making Gen 2 back in late 2023. Gen 1 is ancient history. This means replacement parts will dry up eventually. Something breaks, you might be stuck with a brick.
They consume more power
If you’re on grid power, the extra cost is minimal. But if you’re off-grid, those extra 20-30 watts mean either bigger solar arrays or more generator runtime. The savings on buying used Gen 2 gets eaten by the higher operating costs pretty quickly.
Used units come with hidden problems
Bought a used Gen 2 on eBay once to test at a remote property. Seller swore it was “like new, barely used.” Fired it up, tried to activate — account had $340 in unpaid service fees. Seller ghosted me. Had to pay the debt just to make the hardware functional.
That’s common with used Starlink. People sell it because they stopped paying the monthly service and racked up debt. Or the hardware has issues they’re not disclosing. Or it got damaged and looks fine externally but has internal problems.
Older gen gets fewer software updates
SpaceX focuses development on the current generation. Gen 3 gets updates and improvements regularly. Older generations get less attention. You’re buying into a platform with less future support.
The price difference between used old-gen and new Gen 3 isn’t worth these headaches. Pay a bit more, get the current hardware, skip the problems.

What You Get in a Starlink Gen 3 Kit
Standard kit includes everything needed to get online:
- The satellite dish (antenna) — 48×30 cm rectangular unit, 2.9 kg. Auto-aims itself, no manual adjustment needed.
- Gen 3 Wi-Fi 6 router — covers up to 3,200 sq ft, supports 235 devices, includes two Ethernet ports.
- Power supply — works with 100-240V, universal voltage.
- 75-foot cable — connects dish to router. Enough for most installations.
- Mounting stand — basic tripod for ground or flat surface mounting.
- Installation guide — though honestly the Starlink app walks you through everything.
That’s the complete package. Plug it in, power it up, you’re online. No additional purchases required for basic functionality.
Optional accessories worth considering:
- Roof mount kit — if the standard tripod doesn’t work for your installation
- Ethernet adapter — if you need wired connection (though Gen 3 router has built-in Ethernet)
- Pipe adapter — for mounting on a pole or mast
- Extended cable — if you need more than 75 feet
Real-World Performance: What to Actually Expect
Forget the marketing claims. Here’s what actually happens when you use Starlink Gen 3:
Speed varies but stays usable
Average download: 120-180 Mbps. Upload: 20-30 Mbps. Rarely hits the theoretical max of 200 Mbps, but consistently delivers solid speeds. Way better than DSL or 4G hotspots in rural areas.
At my cousin’s farm, speed tests typically show 140-160 Mbps down. His kids stream Netflix on three different devices while he’s on Zoom calls — no buffering, no lag. That was impossible with their old satellite internet or the spotty cellular signal.
Latency is genuinely low for satellite
Usually 25-35ms. Sometimes dips to 20ms, occasionally spikes to 45ms during peak hours. Compare that to old satellite internet at 600-800ms, or even Gen 2 at 40-60ms. For video calls and light gaming, it feels close to cable internet.
Not perfect for competitive FPS gaming where every millisecond counts, but plenty good enough for most online activities.
Weather affects it less than you’d think
Heavy rain can drop speeds by 20-30% temporarily. Heavy wet snow might cause brief dropouts. But it’s surprisingly resilient. The dish has built-in heating that melts snow and ice.
During that 18-inch snowstorm at the farm, speeds dropped from 150 Mbps to about 110 Mbps during the heaviest snowfall. Never completely lost connection. Once the storm passed, speeds bounced back to normal.
Obstructions matter more than anything
This is where people mess up. The dish needs clear view of the sky — 110-degree field of view. Trees, buildings, anything blocking line of sight to satellites causes problems.
Starlink app has a great obstruction checker. Point your phone camera at the sky from where you plan to mount the dish. App shows if there are obstructions. Use it. Don’t guess. I’ve seen people mount dishes under tree canopy and then complain about dropouts. Clear sky view isn’t optional.
Who Should Actually Get Starlink Gen 3
It’s not for everyone. Be honest about your situation:
You absolutely should get it if:
You live somewhere with no decent internet options
Rural areas where cable and fiber don’t reach. Places where DSL maxes out at 3 Mbps. Locations where cellular is spotty. If your current option is either terrible internet or no internet, Starlink makes sense.
My cousin’s nearest cable provider was 8 miles away and quoted $15,000 to run line to his farm. Starlink cost a fraction of that and was operational within days of the box arriving.
You work remotely and need reliable connection
If your income depends on video calls, uploading files, accessing cloud services — and you live somewhere without fiber — Starlink solves that problem. It’s not cheap, but neither is losing work because your internet keeps dropping.
You need backup internet for critical applications
Some people keep Starlink as failover. Main internet goes down, Starlink takes over automatically. For businesses, medical offices, anyone who can’t afford downtime — having Starlink as backup is cheaper than lost revenue from outages.
You move around (RVs, boats, remote work locations)
The Roam plan lets you take Starlink wherever you go. Set it up at each location, internet follows you. Perfect for digital nomads, RV travelers, people who work seasonal locations.
You probably shouldn’t get it if:
You already have good broadband
If you have fiber or cable delivering 100+ Mbps reliably, paying $120/month for Starlink doesn’t make sense unless you need backup. Fiber is faster, more stable, and usually cheaper.
You live in dense urban area with no sky view
Apartment building surrounded by other tall buildings? Trees everywhere? Starlink needs clear sky. If you can’t get that 110-degree unobstructed view, connection will be frustrating.
Budget is extremely tight
Hardware costs $599, plus $120/month service. That’s not cheap. If that’s a financial stretch, maybe better to stick with whatever cheaper option exists, even if it’s slower.
You need ultra-low latency
Professional esports, stock trading, certain industrial applications need sub-10ms latency. Starlink can’t deliver that. Its 25-35ms is great for satellite, but not competitive with fiber for latency-critical applications.
Where to Buy Starlink Gen 3
Two main routes:
Direct from SpaceX
Go to starlink.com, order directly. Pros: definitely getting official hardware, no middleman markup. Cons: shipping from wherever SpaceX ships from, potential customs if ordering internationally, all support in English.
From authorized resellers
Faster delivery, local support, sometimes better for international buyers. Make sure you’re buying from legit authorized dealers. For example, here’s a verified Gen 3 kit — new units, no account debts, full warranty, ships within your country.
Red flags when buying:
- ❌ Price significantly below retail — probably used or has account debts
- ❌ Seller can’t provide proof of purchase or warranty
- ❌ “Previously owned but barely used” — why are they selling?
- ❌ Won’t provide hardware serial number for verification
- ❌ Can’t demonstrate the unit works before purchase
What you want to see:
- ✅ New, sealed box with all original packaging
- ✅ Clear warranty terms
- ✅ Ability to return if DOA (dead on arrival)
- ✅ Seller can show previous successful transactions
- ✅ Price within normal retail range ($599-699)
Setup Process: What Actually Happens
From box to working internet, step by step:
Step 1: Check for obstructions (do this first)
Before even unboxing, download the Starlink app. Use the obstruction checker. Walk around your property with your phone, checking different potential mounting spots. Find somewhere with clear sky view. Don’t skip this. Seriously.
Step 2: Unbox and position the dish
Set up the tripod, place dish, connect the cable. Put it in the spot you identified with the app. If roof mounting, secure it properly — wind can knock loose hardware around.
Step 3: Connect power and router
Plug cable into router, router into power. System boots up automatically. Dish starts moving around on its own, finding satellites. This takes 5-15 minutes. Don’t panic if it’s moving — that’s normal during initial setup.
Step 4: Create account and activate service
Open Starlink app, create account, enter payment info, choose service plan. If hardware is new and unregistered, this takes maybe 5 minutes. If there are account issues, you’ll find out here.
Step 5: Connect your devices
Find the Starlink Wi-Fi network, enter password (it’s on the router), connect. Test it. If you can load a webpage and run a speed test, you’re golden.
Total time from opening box to working internet: 30-60 minutes including mounting. Faster if you’re just setting tripod on ground, slower if you’re doing roof installation.
At my cousin’s place, we had it running within 45 minutes. Longest part was getting on the roof safely. Actual technical setup was maybe 15 minutes.

Common Questions About Starlink Gen 3
How much is the monthly service?
Residential (stationary): $120/month in most areas. Roam (mobile): $150/month. Priority (business with guaranteed speeds): $250/month. Data is unlimited on all plans.
Can I pause service when not using it?
Yes, you can pause for up to 2 months per year for free. Good for seasonal cabins or vacation properties.
Does it work while moving?
Depends on your plan and mounting. With Roam plan and proper mounting, it works in moving vehicles. Standard Residential plan requires stationary use.
What happens in bad weather?
Light rain: no effect. Heavy rain: slight speed reduction. Snow: dish melts it automatically. Thunderstorms: might disconnect temporarily for safety. Overall, surprisingly weather-resistant.
Can I use my own router?
Yes, Gen 3 router has Ethernet ports. You can connect your own router if you prefer. But the included router works fine for most people.
How much power does it use?
40-50 watts during normal operation. Can spike to 80 watts briefly during snow melting. Over a month, that’s roughly 30-40 kWh.
Will trees block the signal?
Yes. Even thin branches cause issues. Use the app’s obstruction checker. If it shows red, don’t mount there. Find clearer spot.
Can lightning damage it?
Dish has some protection but adding a surge protector is smart. Lightning strikes are rare but expensive if they hit. $50 surge protector beats $599 replacement dish.
How long does hardware last?
5-year warranty suggests at least that long. Early Gen 1 units from 2020 are still working. Built to survive outdoors year-round.
Can I upgrade from Gen 2 to Gen 3?
SpaceX sometimes offers upgrade programs for existing customers. Check your account page or contact support. Usually involves returning old hardware and paying discounted price for new.
Bottom Line: Is Starlink Gen 3 Worth It?
Depends entirely on your situation. It’s not magic, it’s not perfect, but for certain use cases it’s genuinely game-changing.
Get it if:
- You live where decent internet doesn’t exist and won’t exist anytime soon
- You work remotely and need reliable connection
- You move around and need internet that moves with you
- $120/month is worth having actual high-speed internet
- You have clear sky view for the dish
Skip it if:
- You have good fiber or cable already
- You can’t afford $120/month ongoing
- You have no clear sky view (trees, buildings blocking)
- You need guaranteed sub-20ms latency
For my cousin on his farm, Starlink Gen 3 solved a real problem. He went from barely-functional 4G hotspot giving 2-3 Mbps to consistent 150 Mbps satellite internet. Now his kids can do online school, he can videoconference with buyers, his wife streams her shows. Life got significantly better.
For someone in a city with gigabit fiber, Starlink makes no sense. It’s slower and more expensive than what they have.
Know your situation, be honest about your needs, and decide accordingly. But if you’re in the right use case, Gen 3 delivers. It just works. And after years of internet that doesn’t work, that matters a lot. 🛰️